How To Make Your Skin Feel Stronger And Thicker

Does your skin look thinner, less bouncy, and more tender? There is no question that the thickness of your skin changes with age. Little by little, your skin feels drier, more tender and less elastic. And with thinner skin comes a weakened skin barrier. When the skin is healthy, it successfully does its job of protecting us from irritation, skin diseases and inflammation. But when our skin barrier is weakened, the body cannot defend itself. We'll explore how thin and weak skin can affect the skin barrier and repair methods to make the skin healthier and stronger.

Why is my skin so thin?

aging

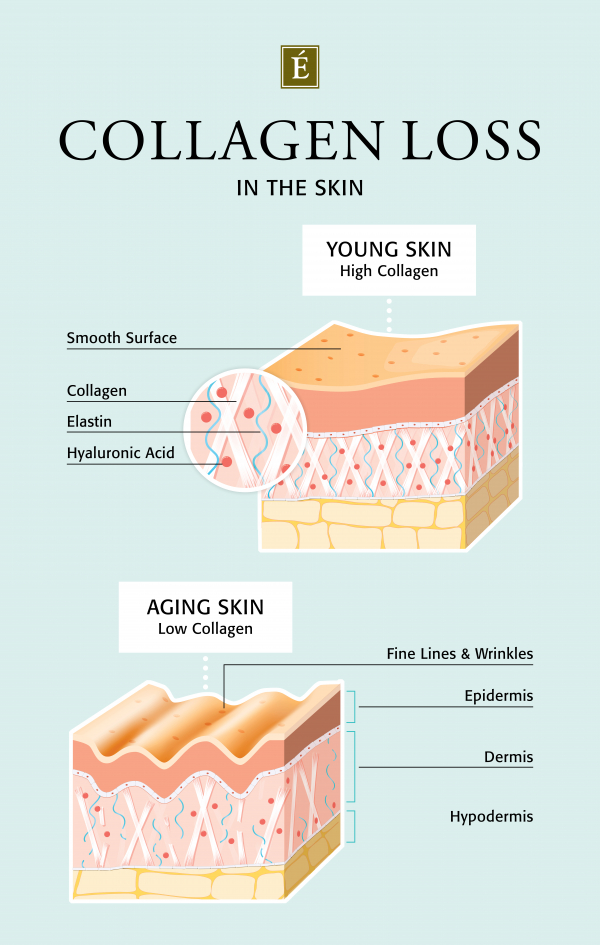
As you get older, you may notice changes in the texture and elasticity of your skin. The reason your skin can appear thinner and drier is because your body makes less collagen as you age. Collagen is the structural protein that gives the skin elasticity, firmness and suppleness. Collagen fibers are the stable pillars that support the top layer of skin and prevent sagging skin. But with the decline in collagen, skin becomes thinner and less supple. You can thank your genetics for how quickly your collagen supply is depleting.

Loss of collagen in the skin infographic

Lifestyle factors including medication

As Healthline suggests, long-term use of certain medications can cause you to develop thin skin, including:

  • Prescription blood thinners
  • Nonsteroidal anti-inflammatory drugs (NSAIDs), such as ibuprofen (Advil) or naproxen (Aleve)
  • Topical and oral corticosteroids
  • Over-the-counter aspirin

There are also a number of lifestyle factors that can lead to early aging and thinning of the skin, including:

  • smoking
  • Excessive alcohol consumption
  • Lack of regular exercise combined with a poor diet high in sugar and refined carbohydrates

Sun exposure

Excessive exposure to ultraviolet light causes sun damage to your skin, and after many years of tanning (and burning) you can begin to develop thinning skin. Sun damage can also take the form of age spots, sagging skin, wrinkling, or skin cancer. You may notice thinning skin on your face, arms, or hands, the parts of your body that are most exposed to the sun.

How does thin skin affect me?

Thin skin doesn't cause medical problems – it's only a problem if your skin bruises easily or is damaged. As Medline Plus notes, “As you age, there is an increased risk of skin damage. Your skin is thinner, more fragile, and you lose some of the protective layer of fat. ”The skin's ability to snap back worsens with age, as does the thickness of the dermis. And bruises and wrinkles appear on thin skin.

If you take care of your skin in addition to your thinning skin, its barrier can be compromised. The skin consists of three layers: The subcutaneous layer consists of sweat glands, fat and tissue. The next layer is called the dermis, which is made up of the blood supply and nerves. The outermost layer is the epidermis, which forms your skin barrier and protects you from bacteria and dirt. A healthy, functioning skin barrier blocks environmental stimuli while retaining natural oils and moisture. An unhealthy skin barrier doesn't protect you from potential skin problems like irritation, inflammation, or dryness. Thin skin is already sensitive enough, but if you don't hydrate very dry skin or exfoliate too much, you can irritate it. If you want to learn more about what causes a damaged skin barrier, read this in-depth guide. Here's a breakdown of the practical ways you can achieve stronger, thicker skin.

How to make the skin stronger and thicker

Eat foods that support collagen production

It has been shown repeatedly that omega-3 fatty acids are essential for increasing collagen production and thus strengthening our skin and improving the barrier function of our skin. Vitamin C also plays an important role in collagen and you can find it in foods like broccoli, leafy greens, and citrus fruits.

A variety of foods can help your body increase collagen production, including:

  • chicken
  • Leafy vegetables
  • Berry
  • Fish and shellfish
  • protein
  • Citrus fruits

Use skin care products that contain peptides

If you are already satisfied with your diet, you can use skin care products that contain peptides to strengthen your skin. Dermatologist Dr. Nancy Samolitis, MD, FAAD told Byrdie, “Peptides are essentially fragmented parts of proteins. So when used in skin care, the goal is for these collagen fragments to stimulate collagen growth … Whole, non-fragmented proteins (like collagen) cannot be absorbed directly through the top layer of skin, leaving those smaller pieces deep inside can penetrate the cellular level. "

Apply moisturizer daily

To strengthen your skin, shift your attention from exfoliating to moisturizing instead. Whether you are a dry, mixed, oily or sensitive skin type, hydrating your skin is the first step towards healthy skin and a strong skin barrier.

Your dehydration could be genetic; You might just be born with a dry skin type. However, if your skin type is indeed oily, mixed, sensitive, or normal, dryness from air conditioning or hot showers to the weather can be the cause. Help your skin stay strong by applying a moisturizer after cleansing. This step helps lock in moisture and protect your skin from the elements.

In the following video our Lead Skin Care Trainer Natalie Pergar has some moisturizer recommendations for every skin type.

(embed) https://www.youtube.com/watch?v=OPXO1mpvGy0 (/ embed)

Are you struggling with thinning skin? Have you tried any of the above tips or other treatments for this problem? Learn more about the Marine Flower Peptide Collection with powerful plant peptides and sea flower technology for stronger, firmer and firmer skin.

12 Effective Exercises of Bigger, Stronger and Toned Butt

A firm and big butt has the benefits of good looks and is beneficial for giving strength, posture and stability to the body. They allow you to do other exercises effectively by providing stability. Not only do they support your regular exercise routine, but they are also helpful for walking, sitting, running and jumping. In short, it can make your life easier.

When doing gluteus training, we often only focus on the gluteus maximus, the largest muscle in the buttocks. The gluteus medius and gluteus minimus are two other muscles besides the largest muscle in the hip. These two muscles also need to be focused in order to properly burn the hip. In this article, you will find exercises that will burn your entire bum. All you have to do is do each exercise perfectly.

Here are 12 effective exercises for bigger, stronger, and tighter buttocks. Choose a combination that suits you best and you can incorporate it into your full body exercise regimen or into your lower body exercise regimen.

1. Gluteal bridge

1. Lie on the floor or mat with your knees bent and your feet hip-width apart.

2. As you exhale, squeeze your glutes and press your heel into the floor. Raise your hips toward the ceiling until your hips are no longer bent.

3. Hold there for 4 seconds.

4. Slowly lower your hips down and relax for 2 seconds.

5. Repeat

2. One-legged Glute Bridge

1. Lie on the floor or mat with your knees bent so your feet are hip-width apart.

2. Raise one leg in the air.

3. As you exhale, squeeze your glutes and press your heel into the floor. Raise your hips toward the ceiling until your hips are no longer bent.

4. Hold there for 4 seconds.

5. Bring your hips down slowly with one leg up and repeat the process.

6. Finish the repetitions with one leg before switching legs.

3. Knee joint

1. Sit so your knees are on the floor. Stand straight with your body above your knees.

2. Keep your hands on the back of your head.

3. Bend your hips back and bend down until your chest is parallel to the floor.

4. Push back into position with your glutes and repeat the process.

4th Classic squat

  1. It targets the gluteus maximus, hamstrings, and the core.
  2. Stand with your feet a little wider than shoulder width. Put your toes slightly outward. Keep your hand by your sides.
  3. Keep your chest raised and the core activated. Push your hips back and bend your knees as you go down. At the same time, bring your hands in front of your chest and connect the fingers of your hands.
  4. Go down until the position feels like you are sitting in a chair.
  5. Now straighten your knees by pushing through your heels as you compress your glutes.
  6. To repeat

5. Jumping squats

  1. Stand with your feet a little wider than shoulder width. Put your toes slightly outward. Keep your hand by your sides.
  2. Keep your chest raised and your back straight while the core is activated. Push your hips back and bend your knees as you go down. At the same time, bring your hands in front of your chest and connect the fingers of your hands.
  3. Go down until the position feels like you are sitting in a chair.
  4. Now prepare for a jump while straightening your knees by pushing through your heels. Do it by squeezing your glutes.
  5. Jump straight, land, and repeat.

6th Pulse squat

  1. It targets the gluteal muscles, quadriceps, hamstrings, and core.
  2. Stand with your feet a little wider than shoulder width. Put your toes slightly outward. Keep your hand by your sides.
  3. Keep your chest raised and the core activated. Push your hips back and bend your knees as you go down. At the same time, bring your hands in front of your chest and connect the fingers of your hands.
  4. Go down until the position feels like you are sitting in a chair.
  5. Now take a pulse by moving your thighs up and down a little for a few seconds.
  6. Now straighten your knees by pushing through your heels as you compress your glutes.
  7. To repeat.

7th Knicks squat

  1. Stand with your feet shoulder-width apart. Pull your hands by the sides.
  2. Take your left leg back and cross your right leg as you bend your front knee until that thigh is parallel to the floor.
  3. Return to the starting position and repeat with another leg.

8th. Jumping lunges

1. Stand upright, feet shoulder width apart and let your hands hang to your sides.

2. Take a big step forward while bending the knee of another leg so that it is almost touching the floor.

3. Jump and swing your legs in the air and switch legs until you land on the floor.

9. Lateral lunges

  1. Stand with your feet shoulder width apart and your hands hanging by your sides.
  2. Take a big step to the right with your right leg and start bending your knee until your thigh is parallel to the floor.
  3. Repeat with another leg.

10. Split squats

1. Stand with your back to a piece of a raised platform.

2. Place your foot on the platform with the back of your shoes facing up.

3. Bend your knee and go down until the other knee hits the floor.

4. Hold there for a few seconds and come back.

11. Lying leg raises on the side

  1. Lie on the left side of your body.
  2. Stretch your legs across one another. Rest your head on your left hand or on a pillow. It is recommended that you lie down so that gravity acts as a drag as you move.
  3. Raise your right leg up to 45 degrees in the air and bring it down. This is a repetition. Do 15-18 reps before switching sides.

Tip: In order to concentrate more on the gluteal muscles, point your feet a little inwards and nominally lean the left hip bone a little forward.

12th Lateral knee raises

  1. Lie on the left side of your body so that gravity acts as a drag. Rest your head on your left hand or on a pillow. Bend your knees forward and form a V with your leg.
  2. Raise your right knee in the air and keep your feet together. Raise the knee to 45 degrees and lower it.
  3. This is a repetition. Do 15-18 reps before switching sides.

Tip: keep the core moving throughout the movement.

Take that away

In choosing the best combination of exercises that will best suit you, consider all of the above, such as lunges, squats, hip abduction. This will effectively burn the muscles and you can expect results faster.

As a beginner, keep the transition within the exercise as smooth as possible. We also recommend starting with fewer repetitions and increasing the repetitions over time. Following these tips can prevent injury.

10 Effective Exercises for Stronger Back

Back training creates strong back muscles that end up looking just perfect and captivating. But there is more to it than looks. It offers endless benefits to your exercise routine and daily leisure routine by isolating you from injury. Remember that the back is the most vulnerable area to injury. However, having a stronger back will help you move on without stopping for breaks to restore health.

Stronger back muscles create a stronger foundation for other exercises. The upper body exercises become easier.

A number of different exercises can be sought to help build muscles of the shoulders. However, it would be helpful if you always strived for an effective and safer route.

You don't need these machines to get stronger again. Just one dumbbell is enough for you. The only caution in performing the exercise is to do it correctly, as one wrong pull can injure the improperly locked muscles.

Here we offer you a reliable guide to the most effective and safest exercises to rebuild your dream.

1. Row of dumbbells

  1. Place your left knee on the bench, reach the path together with your gloved hand, and then lean forward. Hence, your upper body is straight.
  2. Make sure your shoulders are a little higher than your hips.
  3. Reach down and take the dumbbell in your hand with a neutral grip with your palms facing back.
  4. Then, hold it together with your arm outstretched and keep your back straight. Make sure to keep your head straight and parallel to your torso.
  5. Move the barbell toward your chest and focus on lifting it along with your back and shoulder muscles instead of your arms. Keep your chest steady and steady as you carry the barbell up.
  6. Remember to keep your back straight.
  7. At the highest point of the movement, squeeze your shoulder blades and back muscles. Do not lift the weight above the shoulder line of the body.
  8. Your legs and hips should be stable and still as you pull up the weights.
  9. Slowly lower the barbell until your arm is relaxed at a straight angle.
  10. Repeat the movement, repeating all of the repetitions on one arm before switching to the opposite side.

Sets: 12 on both sides

Repetitions: 2 on each side

2. Incline line

  1. Set the bench to 45 degrees. And lie down on your chest and keep your whole body straight. Adjust the legs so that they have a full grip.
  2. Grasp the dumbbells with both hands with your palms facing back.
  3. Move the barbell toward your chest and focus on lifting them together by focusing on the muscles of the upper arm. Keep your chest steady and steady as you carry the dumbbells up.
  4. Do not lift the weight above the shoulder line of the body. At the highest point of the movement, squeeze your shoulder blades and back muscles.
  5. Slowly lower the barbell until your arm is relaxed at a straight angle.
  6. Repeat the movement, repeating all of the repetitions on one arm before switching to the opposite side.

Movements: 12

Repetitions: 2

3. Bent over the row

  1. Grab the dumbbells with both hands and bend forward at 45 degrees, keeping your back straight.
  2. Raise the weights straight until they reach the shoulder line. The entire body should be stable.
  3. Lower the weights straight down. This is a repetition.

Movements: 12

Repetitions: 2

4th Reneged row of dumbbells

  1. Take up push-up positions, but instead of keeping your palms on the floor, hold the dumbbells with your palms facing each other.
  2. Reach into the core and raise one arm straight up until it reaches the shoulder line.
  3. Hold there and press the shoulder boring.
  4. Lower your hand; This is a repetition. Follow the same thing with another hand.

Movements: 12

Repetitions: 3

5. Fly backwards

  1. Stand with your feet shoulder-width apart and hold the dumbbells by your sides.
  2. Push your hips back and bend forward while keeping your back straight. Bend at about 75-90 degrees
  3. Let the weights hang straight down, palms facing back, the core locked into place, and knees slightly bent.
  4. Exhale and lift both arms out by your sides, pressing your shoulder blades together.
  5. Keep your elbows slightly bent and reach up to the shoulder line.
  6. Inhale as you lower the weight back to the starting position.

Movements: 12

Repetitions: 2

6th Increased Plank Row Hold

  1. Plank with one hand on a raised platform
  2. Take a dumbbell in one hand with your palms facing to the side.
  3. Lift the weight straight up until it reaches the shoulder line.
  4. Squeeze your shoulder blades together and hold the position while holding a traditional plank. For 30 seconds
  5. Lose weight and relax

Time: 30 seconds

Sentences: 3

7th Farmer & # 39; s Carry

  1. Grasp heavy dumbbells firmly with both hands
  2. Stand up straight with your feet about shoulder width apart and your arms resting at your sides.
  3. Tighten your core muscles, pulling your shoulder blades down and back, making sure your posture is upright and facing forward.
  4. Start running with an active core. Keep your back straight at all times.

Distance: 120 meters

Sentences: 2

8th. Alternating backward fly

  1. Stand with your feet shoulder-width apart and hold the dumbbells by your sides.
  2. Push your hips back and bend them forward, keeping your back straight at about 75-90 degrees
  3. Let the weights hang straight down, palms facing back, the core locked into place, and knees slightly bent.
  4. Exhale and lift one arm out by the sides, squeezing the shoulder muscle.
  5. Reach up to the shoulder line.
  6. Inhale as you lower the weight back to the starting position. This is a repetition
  7. Follow with another hand

Movements: 12

Repetitions: 2

9. Romanian deadlift

1. Stand shoulder width apart with half a foot under the barbell.

2. Bend over and grab the bar with a shoulder-width grip

3. Keep your back straight and grab the bar by bending your hips back and not bending your knees too much.

4. Dig with your palms facing back.

5. Bring the bar up without arching your back by moving your hips forward.

6. lift until you are standing straight and holding the barbell in your straight hands.

7. Breathe, hold it and stand with the weights.

8. Without arching your back, bend your hips back and come down until the barbell hits the floor. This is a repetition

9. Raise the barbell again. in the same way to get a full sentence.

Movements: 12

Repetitions: 2

10. PRONE Y raises

  1. Lie completely on the floor with chest to toe touching the floor.
  2. Keep your arms stretched out at your sides, but just a little in front, and make a “Y” on your body.
  3. In the company of your chest and head, raise your arms a little in the air and hold them for a few seconds until you feel the burning sensation in your shoulders.
  4. Remember to keep your neck in a comfortable position without straining it while lifting the weight.
  5. Relax and repeat

Movements: 12

Repetitions: 2

Take that away

These exercises are the most effective. Follow all of the guide to get bulky and tighter. You can include all or a combination of a few in your regimen, as needed.

Since the back is most prone to injury, remember to keep your back straight and stable at all times to avoid injury.

On the subject of matching items:

Shoulder exercises

Dumbbell chest fly

Top 5 chest muscle exercises

9 Effective Exercises For Stronger Calves

Those strong calves always made you jealous of others, right? Looking at strong calves gives you an idea of ​​excessive exercise, but hey! That's not the case. Getting bumpy calves isn't that difficult, but it's the most ignored muscle in the exercise routine. Built calves add a more perfect look to muscular legs and have other benefits.

Your calf muscles propel you forward with every step, taking the load. Hence, stronger calves would help you run faster and jump higher. In short, it improves overall cardio strength.

All you need is a reliable guide to safer exercise that focuses on the calves.

Here we recommend 9 effective calf exercises. Please include them in your leg tag for faster results.

1. Jumping lunges

  1. Stand straight with your feet shoulder-width apart.
  2. Take a long step forward while simultaneously bending the knee of another leg so that it almost touches the floor.
  3. Jump and swing your legs in the air and switch legs until you land on the ground.

Repetitions: 12-15

Sentences: 2

2. Walking lunges

  1. Hold dumbbells. Stand upright, casually.
  2. Take a long step forward while simultaneously bending the knee of another leg so that it almost touches the floor.
  3. With the pressure on the front leg, come together in front of both legs.

Now follow the same thing with another leg.

Representative: 12-15

Sets: 2

3. Jump S.Quats

  1. Stand up straight with your legs shoulder-width apart.
  2. Take a long step forward while simultaneously bending the knee of another leg so that it almost touches the floor.
  3. Hold for a few seconds.
  4. Jump in the air and raise your arms
  5. Crouch down again. This is a repetition

Representative: 12th

Sets: 3

4. Raised calf R.Aises

  1. Come to the first step on the stairs.
  2. Just put your toes on the platform and lift your heels up.
  3. Lower your heels towards the floor and keep your balance on your footballs.
  4. Press up on your toes, bend your calves, lower your back to the lower position, and repeat the process

Repetitions: 12-15

Sentences: 2

5. Seated calf raises

  1. Sit on a bench or chair.
  2. Hold dumbbells by your thighs.
  3. Lift your heels as high as possible.
  4. Slowly lower to the floor and repeat.

Representative: 12th

Sets: 2

6. Farmer's Walk on Toes

  1. Hold the dumbbells with both hands.
  2. Stand shoulder width apart and the core locked into place.
  3. Lift your heels and walk on your toes until you hit the target reps.

Representative:12-15

Sets:2

7th Downward dog

  1. Place your palms on the floor and do an inverted V stance
  2. Make sure to keep your back straight and the core engaged.
  3. Touch the floor with your heels and feel the stretch in your calves. Raise your hips as high as possible.

Representative: 12-15

Sets: 2

8th. Skipping rope

  1. Stand on your toes
  2. Hold the ends of the rope in your hands
  3. Swing the rope from back to front. Jump and let the rope out from under your feet. Keep doing this until you have completed the repetitions.

Representative:30-40

Sets:3

9. To run

Running, walking, and hiking are excellent calf strengthening exercises. Running helps build strong muscles and build strong bones as it is a stressful exercise. Running also improves cardiovascular fitness and burns many kilojoules.

TIP: Warming up the legs is always recommended. Start slowly and be consistent as you add running to your exercise routine.

Run according to your capacity and increase the distance over time.

DJI Mavic Air 2 Review: Better, Smarter, and Stronger

"Whether you are traveling for the first time or as a casual pilot, the DJI Mavic Air 2 rules the sky."

  • Detailed and crisp 4K 60 FPS footage

  • Excellent dynamic range with HDR recording

  • Easy to control

  • Long lasting battery life

  • Obstacle avoidance

  • The camera cannot deal with poor lighting conditions

DJI's dominance in the consumer drone market is relentless. It wasn't until last autumn that the company delighted everyone with its lightest and smallest drone, the Mavic Mini. However, to reach this size, the company had to remove some features that made it attractive for first-time buyers, but not for serious enthusiasts.

Enter the Mavic Air 2, successor to Mavic Air from 2018 and a far more legitimate competitor in the prosumer market. Given its outstanding features like 4K recording at 60 frames per second (FPS), the high-resolution 48-megapixel snapshot mode and a flight time of 34 minutes, you would think that this would cost as much as the Mavic Pro 2, but it does not, and that's what sets it apart.

Bloat

The Mavic Air 2 is slightly larger and heavier than its predecessor (570 grams). This is not a problem at all because the arms can be folded quickly for easy storage – ideal for stowing in a backpack. Sure, the Mavic Mini can be flown without having to register it with the Federal Aviation Administration (FAA), but the Mavic Air 2 maintains the same portability to make it a weekend street fighter. For comparison: The Mavic Mini measures 160 x 202 x 55 mm unfolded, while the Mavic Air 2 is not much larger with 183 x 253 x 77 mm.

As for looks, I don't mind that it has more to do with the Mavic Pro line – it's still a sleek drone. It has the same hard lines on its chassis, making it look more aggressive than its predecessor. Frankly, given the upgrades under the hood, it's a legitimate change. DJI drones have always set a standard for appearance, and the Mavic Pro maintains that. It looks and feels like a high-end part of the kit.

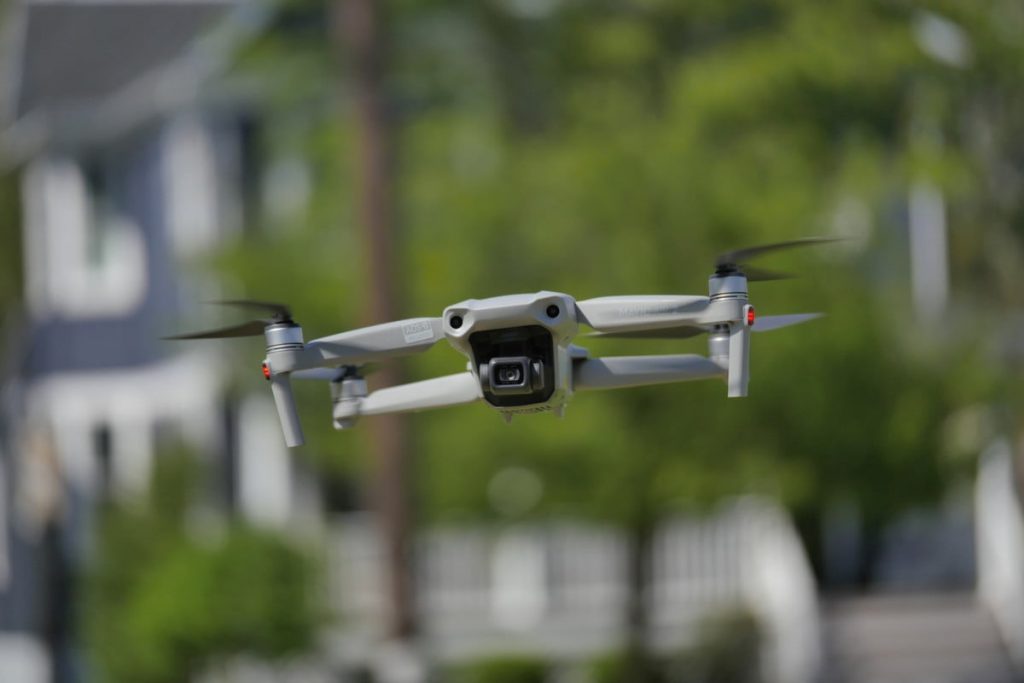
DJI Mavic Air 2 body close-up

If you are worried that the extra mass will slow down the speed, you shouldn't. The speed is not affected a bit – like its predecessor, it can reach a maximum speed of 42.5 miles per hour. You really get a feel for its speed in sport mode, which has stricter controls that help the Mavic Air 2 achieve a sophisticated acrobatics in the air. The maximum speed is only available in sport mode.

For most pilots, the normal mode with its balance between speed and responsiveness is more than enough, while the tripod mode offers slower and quieter movements.

It's also quieter than other drones I've flown, and its hum is almost quiet when it hovers in the air at about 150 feet. The most impressive thing is that the battery is designed for a flight time of 34 minutes, which is the longest in the Mavic line. Only a few drones for end users ever reach a speed of almost 30 minutes, with the vast majority clocking in the range of 20 to 25 minutes.

There is a lot of muscle power in a compact body.

Beginners will appreciate the intelligent pilot functions of the Mavic Air 2, which protect the drone from collisions and risky situations. The same forward and backward obstacle sensors as in the Mavic Air are also here, although they benefit from the predecessor by additional sensors pointing downwards. All of this helps power the latest DJI obstacle avoidance system.

In my experience, it has prevented the drone that is dead in its tracks from hitting a tree, even if you are still pressing your thumb on the controls. When you spend a huge amount of money on the Mavic Air 2, it's comforting that it's smart enough to avoid these disasters.

So when you look at everything that is on board, it is remarkable that everything is well packed together. It's a lot of muscle in a compact body.

Camera quality

At the center of the Mavic Air 2 is a new 12 megapixel 1/2-inch Quad Bayer CMOS sensor on a 3-axis gimbal. It is a larger sensor than the Mavic Air and Mavic Mini, so the overall performance alone can be improved.

Shutterbugs are particularly pleased with a new high-resolution 48 megapixel mode. Some comparison shots have greater detail and sharpness compared to the 12 megapixel shots, but the dynamic range isn't as good. However, some details in the shadows can be restored using an editor in the post. There's definitely a reason to use high-resolution mode, especially if you want to crop images later. In addition, I found the 12 megapixel snapshots perfect for social media posts.

There are significant improvements everywhere on the video page. It primarily records 4K video at 60 FPS, which even surpasses the 4K recording of the Mavic 2 Pro at 30 FPS. It's also worth noting that in this mode, a bit rate of 120Mbps (with HDR video recording at 100Mbps) is recorded, which gives more space to get details in the shadows and lights in the post. I also prefer the D-Cinelike profile because of its low contrast and unsaturated colors, because I can sort it better in the post according to my wishes.

It is undisputed that 4K 60 FPS and a bit rate of 120 Mbit / s are unique offers in the Mavic series and are also unique for drones in the same price range. Around $ 1,000 drones offer 4K 60FPS, and you'll generally have to run into this higher price range to get a competitive video bitrate.

The Mavic Air 2 also offers HDR video recording, a handy option for those who want to get the best results without having to work on footage later. This is due to the improved dynamic range as the highlights are toned down to prevent the sky from being blown out. Colors also get an increase in saturation to improve the overall picture, but noise is more common in shadows. In ideal conditions, however, it's not as distracting when it's sunny.

DJI Mavic Air 2 close-up of the camera

Other notable improvements over the predecessor are 1080p slow motion with 120 and 240 FPS and an 8K hyperlapse mode, which speeds up the footage in bite-size clips considerably. In addition, you have the cool shooting modes – like rocket, circle, and asteroid – that DJI has perfected to offer professional video to content creators.

The Mavic Air 2 has the tools and features that professionals crave to continue producing high quality content, but is also great for new flyers. The only disadvantage is that the quality decreases significantly in poor lighting conditions. I took it out at dusk with the sun already below the horizon. Even the larger sensor is still not enough to draw more light from the scene, which leads to high noise and loss of detail.

There are differences in performance, for example, that you get from the larger 1-inch sensor of the Mavic Pro 2 compared to this, which is why it is no surprise that performance in poor lighting conditions is not a drastic improvement over its predecessor. I wouldn't expect another drone with a 1/2 inch sensor to perform better.

Fly smarter

It's been a while since I last piloted a drone, but the safety standards introduced with the Mavic Air 2 make flying a breeze. Of course, the obstacle sensors discussed earlier help avoid collisions, but there are some other safety features that calm the mind.

The landing of the Mavic Air 2 is made easier under difficult lighting conditions by an additional light on the bottom of the drone. AirSense technology enables ADS-B signals to be received from other nearby aircraft and displays their locations on the screen. Finally, the updated APAS 3.0 system intelligently enables the Mavic Air 2 to avoid collisions and, in some situations, allows it to determine a path around obstacles. It is not always perfect to make some of these decisions, but I still have to face a serious collision.

DJI Mavic Air 2 controller

The controller supplied with the Mavic Air 2 has been redesigned. This time there is an area that you pull out from above to weigh your smartphone. It can be a little picky, especially if you have a thicker case on your phone. However, I like how the corresponding cable for connecting your smartphone is neatly stowed in the controller. The controller is a bit bulky, but I found it convenient to use.

In one case, the video feed was disconnected from the drone approximately 600 feet from my location during a flight. It was a heartbreaking moment, but I restarted the app, walked a few steps from my location, and the feed was set up again.

The Mavic Air 2 has updated Ocusync 2.0 transmission technology, which is supposed to deliver a reliable video feed at a distance of more than 10 kilometers, but must be line of sight. In my case, a small building may have blocked the connection. Fortunately, I only had to move a little to reconnect.

Our opinion

The DJI Mavic Air 2 is an impressive drone that is fun, easy and safe to fly. Whether you are new to the drone scene or an experienced professional pilot, the Mavic Air 2 offers everything you need. The price of the standard package is $ 799. However, I recommend spending the extra money to pick up the "Fly More Combo" for $ 988 as you get more value. You get a total of three batteries, a set of ND filters, additional propeller blades and a carrying case for the extra money.

Is there a better alternative?

Yes and no. The DJI Mavic Mini is an excellent drone for first and occasional pilots, which is partly due to its small size and lower costs. However, it does not achieve nearly the same range of functions as the Mavic Air 2.

Professionals who value performance should take a look at the Mavic 2 Pro, especially the larger sensor, which is better equipped in low light conditions. However, it is twice as expensive.

As for the rest? The only other drone that comes close to the Mavic Air 2 is the Skydio 2, which has a more sophisticated obstacle avoidance system. However, it costs more, runs shorter on battery life, and doesn't collapse into a more compact size.

How long it will take?

If you take the right flight arrangements, the solid build quality of the Mavic Air 2 will keep it going smoothly for a while. The propeller blades may need to be replaced at some point, but DJI throws an extra set into the box.

Buyers should also consider buying DJI Care Refresh + for $ 135 to protect the drone from water damage, collisions, and other crashes. It is comforting when you fly.

Should you buy it

Yes. This is an excellent drone that combines a lot of functions at a medium price.

Editor's recommendations


Getting Bigger, Getting Stronger, Getting Smarter

Daniel DeBrocke is a strength and conditioning trainer who mainly works with power lifts and an educator who works hard to share his knowledge without asking for anything. As a competitive powerlifter, it holds a total of £ 1,700. DeBrocke also wrote: Is lifting heavy weight important for building muscle? among other great articles about Breaking Muscle.

In this episode we discuss:

  • How he took himself from 165 to 286 pounds
  • How beginners can build muscles most efficiently
  • How advanced lifters should sequence their training to make optimal progress
  • Pivot blocks, strategic variations, labor capacity development and more